Chat GPT: Let's develop our own artificial intelligence chatbot
2023-04-17
In the last years, natural language processing (NLP) has become increasingly popular, and chatbots have become a popular way to communicate with customers or users. With the help of deep learning algorithms chatbots can generate responses that are indistinguishable from those made by humans. In this blog post, we will explore how to develop our own chat GPT model in Python, using the GPT-2 architecture as a guide.
Before we begin, let’s understand what GPT is. GPT stands for "Generative Pre-trained Transformer". It is a deep learning algorithm that uses a transformer architecture to generate natural language text. GPT models are pre-trained on large datasets, such as Wikipedia, news articles, blog posts etc; and then fine-tuned on specific tasks, such as language translation or sentiment analysis.
The GPT-2 model, which was released in 2019 by OpenAI, is one of the most advanced language models available today. It has been trained on a large dataset (aprox 45 TB) of web pages, news articles, and books. It allows the model to generate coherent, human-like text with a high level of accuracy.
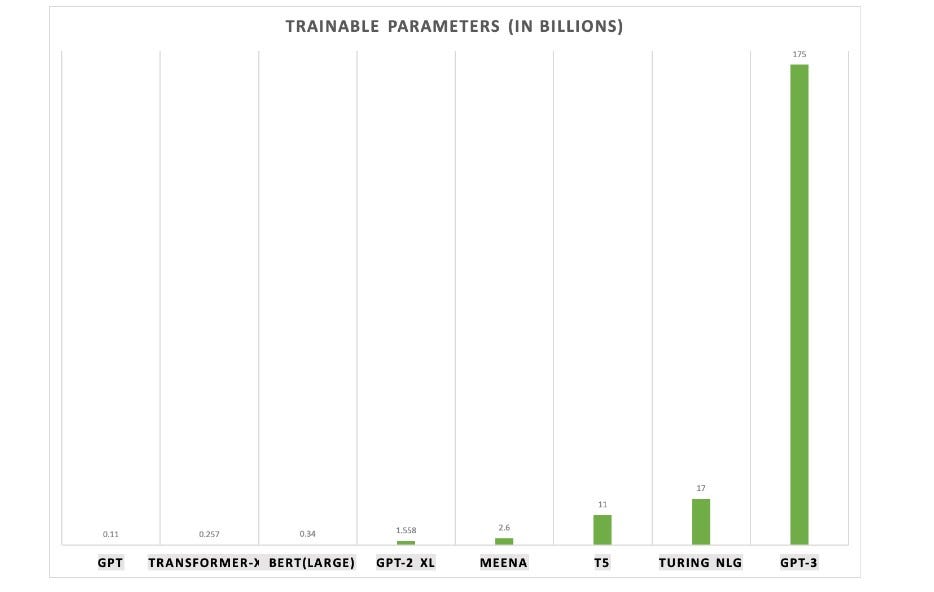
Another thing that makes GPT-3 so transformative is the huge amount of parameters that were used to train the model. The number passes 170 billion, which is 10 times more than the then largest model.

Now, let’s dive into the code and see how to develop a chat GPT-like model in Python.
Step 1: Install The Required Libraries
First of all, we need to install the required libraries. The most important library is TensorFlow, an open-source machine learning framework developed by Google. TensorFlow provides the tools we need to build and train our chatbot model. We also need to install the Hugging Face library, a popular NLP library that provides pre-trained models and tools for fine-tuning them.
To install TensorFlow, open a terminal window and type the following command:
pip install tensorflow
To install the Hugging Face library, type the following command:
pip install transformers
Step 2: Define The Data
Now, we need to define the data that our chatbot will be trained on. We can use any text dataset for this purpose. However, for a chatbot, we need a dataset that contains conversations. We can use the Cornell Movie Dialogs Corpus dataset, which contains conversations between movie characters.
To download the dataset, type the following command:
wget http://www.cs.cornell.edu/~cristian/data/cornell_movie_dialogs_corpus.zip
Extract the zip file and navigate to the "movie_lines.txt" file. This file contains the conversations between movie characters.
Step 3: Pre-process the Data
To use this data to train our chatbot model, we need to pre-process it. We need to extract the conversations from the dataset and convert them into a format that can be used by the GPT-2 model.
To do this, we can use the following Python code:
import os
import csv


def get_conversations():
    conversations = []
    with open(os.path.join('cornell_movie_dialogs_corpus',
              'movie_lines.txt'), 'r', encoding='iso-8859-1') as f:
        lines = f.readlines()
        for line in lines:
            parts = line.strip().split(' +++$+++ ')
            if len(parts) == 5:
                conv_id = parts[0]
                line_text = parts[4]
                conversations.append((conv_id, line_text))
    return conversations
This code reads the conversations from the "movie_lines.txt" file, extracts the conversation ID and text, and writes them into an fomtted array.
Step 4: Train the Model
Once we have pre-processed the data, we can start training our GPT-like chatbot model. To do this, we need to define the model architecture, load the pre-trained GPT-2 model from the Hugging Face library, and fine-tune it on our conversation dataset.
Here’s the Python code for defining and training the model:
import tensorflow as tf
from transformers import TFGPT2LMHeadModel, GPT2Tokenizer

def train():
    tokenizer = GPT2Tokenizer.from_pretrained('gpt2')
    model = TFGPT2LMHeadModel.from_pretrained('gpt2')

    # Load the conversation dataset
    conversations = get_conversations()

    # Tokenize the conversations and create input/output pairs
    input_ids = []
    output_ids = []
    for i in range(len(conversations) - 1):
        input_text = conversations[i][1]
        output_text = conversations[i + 1][1]
        input_tokenized = tokenizer.encode(input_text,
                add_special_tokens=False)
        output_tokenized = tokenizer.encode(output_text,
                add_special_tokens=False)
        input_ids.append(input_tokenized)
        output_ids.append(output_tokenized)

    # Pad the input/output pairs to the same length
    max_length = max(len(ids) for ids in input_ids + output_ids)
    input_ids = \
        tf.keras.preprocessing.sequence.pad_sequences(input_ids,
            maxlen=max_length, padding='post')
    output_ids = \
        tf.keras.preprocessing.sequence.pad_sequences(output_ids,
            maxlen=max_length, padding='post')

    # Define the training parameters
    batch_size = 16
    epochs = 10
    optimizer = tf.keras.optimizers.Adam(learning_rate=5e-5)

    # Compile the model
    model.compile(optimizer=optimizer, loss=model.compute_loss)

    # Train the model
    model.fit(input_ids, output_ids, batch_size=batch_size,
              epochs=epochs)

    # Save the trained model
    model.save_pretrained('chatbot_model')
This code first loads the GPT-2 tokenizer and model from the Hugging Face library. It then tokenizes the conversations and creates input/output pairs. Then, it pads the input/output pairs to the same length and defines the training parameters, such as batch size and learning rate.
Finally, it compiles and trains the model on the conversation dataset, using the Adam optimizer and the compute_loss method of the model. After training, it saves the trained model to disk.
Step 5: Test the Model
Once we have trained the model, we can test it by generating responses to user input. We can do this by loading the trained model and using it to generate text based on a user’s input.
Here’s the Python code for testing the model:
def test():
    tokenizer = GPT2Tokenizer.from_pretrained("gpt2")
    model = TFGPT2LMHeadModel.from_pretrained("chatbot_model")

    while True:
        input_text = input("User: ")
        input_tokenized = tokenizer.encode(input_text, add_special_tokens=False)
        input_ids = tf.keras.preprocessing.sequence.pad_sequences([input_tokenized], maxlen=max_length, padding="post")
        output_ids = model.generate(input_ids, max_length=max_length, num_beams=5, no_repeat_ngram_size=2, early_stopping=True)
        output_text = tokenizer.decode(output_ids[0], skip_special_tokens=True)
        print("Bot:", output_text)
This code first loads the trained model and tokenizer. It then prompts the user for input, tokenizes the input, and generates a response using the generate method of the model. Finally, it decodes the generated output and prints it out to the user.

And that is it! We created our own chatbot model, you can customize it as much as you like, adjusting the parameters or changing the dataset so that the responses meet your needs better. Right below are some tips on how to proceed with the development and here is the link to the Notebook Python I left with this code 100% working, remember to upload the dataset in the root of the project!
Extra: Improving The Model
Once we have a basic chatbot model up and running, we can start working on improving its performance or customizing it. Here are a few things we can do:
- Fine-tune the Model on a Larger Dataset: We can fine-tune the model on a larger dataset of conversational data to improve its ability to generate high-quality responses.
- Experiment with Different Model Architectures: We can experiment with different model architectures, such as GPT-3 or other transformer-based models, to see if they perform better than GPT-2.
- Add Custom Training Data: We can add custom training data to the model to help it learn to generate responses that are specific to our use case.
- Incorporate User Feedback: We can incorporate user feedback into the model by allowing users to rate the quality of the responses and using this feedback to retrain the model.
Conclusion
Today, we have seen how to develop a GPT-like chatbot model in Python using the Hugging Face library. We have covered the steps involved in data pre-processing, model training, and testing, as well as ways to improve the model’s performance.
With a little bit of work, we can create a chatbot model that is capable of generating high-quality responses to user input. This can be a valuable tool for businesses and organizations that need to provide customer support or engage with users on social media.
Thanks for reading! Before you go:
- 👏 Clap for the story
- 📰 Read my other posts here
- 🔔 Follow me: Medium | LinkedIn
- 🌐 Visit my page: cefas.me
References
- Hugging Face Transformers Documentation: https://huggingface.co/transformers/
- GPT-2 Explained: A Complete Guide to the OpenAI Model: https://towardsdatascience.com/gpt-2-explained-a-complete-guide-to-the-openai-model-ef1d2546c84d
- How to Fine-Tune GPT-2 for Text Generation (using PyTorch): https://towardsdatascience.com/how-to-fine-tune-gpt-2-for-text-generation-using-pytorch-2ee61a4f1ba7
- Chatbot Tutorial: How to Build a Chatbot from Corpus to Deployment: https://www.analyticsvidhya.com/blog/2020/01/how-to-build-your-own-chatbot-nlp/
- How to Develop a Chatbot Using PyTorch: https://www.analyticsvidhya.com/blog/2021/03/how-to-develop-a-chatbot-using-pytorch/
- Cristian Danescu-Niculescu-Mizil, & Lillian Lee (2011). Chameleons in imagined conversations: A new approach to understanding coordination of linguistic style in dialogs.. In Proceedings of the Workshop on Cognitive Modeling and Computational Linguistics, ACL 2011.
- OpenAI GPT-3: Everything You Need to Know: https://www.analyticsvidhya.com/blog/2021/03/how-to-develop-a-chatbot-using-pytorch/